LiME and Volatility 2 Setup for Unix and Linux Forensics
Introduction
Volatility 2 is a powerful python volatile memory extraction utility framework. Volatility 2 uses operating system “profiles” when analyzing a memory dump, which can be specified at runtime. Windows profiles are included in the base Volatility 2 repository, while Linux profiles can be found externally and sometimes require custom initialization.
This guide will specify the additional steps required to analyze a memory dump taken from a Linux machine, including how to create the profile Volatility requires for analysis.

Volatility 2 directory cloned
note: this blog post was inspired by an assignment in CSEC 464 (Computer System Forensics) @ RIT
Memory Collection with LiME
1. Acquire the LiME source code
Acquire the source code for LiME on the target device or on a USB to be attached to the target device. This can be done by cloning the github repository:
git clone https://github.com/504ensicsLabs/LiME
USB users should ensure that the host device has the same configuration (Linux flavor, headers, etc) as the target device.
2. Build LiME
To build LiME, enter the LiME/src/ folder, and type make.
cd LiME/src/
make
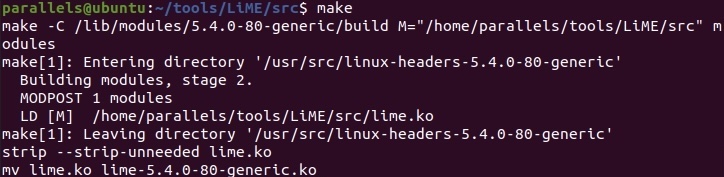
A file named lime-[VERISON]-generic.ko should appear. USB users should ensure that [VERSION] matches the uname -a of the target device.
3. Insert LiME into the kernel and dump the memory
Note: USB users should insert their USB into the target device prior to beginning step 3
Load the compiled LiME file into the kernel by executing the following command:
sudo insmod lime-[VERISON]-generic.ko "path=/path/to/dump/memory.bin format=padded"

Optionally verify that LiME is loaded by using the lsmod command.
lsmod | grep lime

Note: The error ERROR: could not insert module lime-5.4.0-80-generic.ko: Unknown symbol in module could indicate that the path parameter path=PATH does not exist, or is misspelled.
Volatility Profile Creation
1. Acquire Volatility 2 source code
Acquire the source code for Volatility 2 by cloning the Volatility 2 github repository:
git clone https://github.com/volatilityfoundation/volatility
Install the dwarfdump library if needed:
sudo apt install dwarfdump
Optionally, you may install pycrypto and distorm3 for python2 to ensure full functionality of Volatility.
2. Build the custom linux profile
On the system with the same configuration as the target device, switch to the tools/linux/ folder and execute make to create a dwarffile:
cd tools/linux/
make
Locate the System.map file at /boot/System.map-[header-version]-generic.
locate System.map

Finally, zip the the module.dwarf file and the System.map together, into the volatility/plugins/overlays/linux directory, to create the custom linux profile.
cd ../..
sudo zip volatility/plugins/overlays/linux/[profilename].zip tools/linux/module.dwarf /boot/System.map-[headers]

Execute the following command to ensure that the custom profile is located by Volatility:
python2 vol.py --info | grep Linux

3. Running Volatility 2
Ensure that the Volatility code is directly executed from the folder it was downloaded into. Execute python2 vol.py rather than vol.py.
For example:
python2 vol.py -f parallels_ubuntu.bin --profile=LinuxUbuntu-5_4_0-80-genericx64 linux_arp
Note: Some users may receive a “KeyError: ‘__int128 unsigned’” error. To fix this, insert '__int128 unsigned': 'unsigned long long', into the tp2vol definition under volatility/dwarf.py1
Conclusion
The duo of LiME and Volatility provide an imense amount of power, once the hurdles of setup are cleared. Volatility 32, released in 2019, is a complete rewrite of Volatility 2, scraping the idea of profiles all together.
The following guides give information and examples on Volatility 2 commands for Linux. Ensure to specify the custom profile created when attempting the commands found.